

Tula Pink Nebula Block of the Month- March
Posted by April Hansen on
First up- an update on the technical side.
If you're doing the sew along with our shop and you chose the three installment plan, invoices for the next portion of the sew along will be along shortly. Hopefully. We were expecting the next shipment shortly, but there have been extensive delays affecting fabric shipments from the suppliers overseas. Thank you for your patience and flexibility over the past few months. Fabric delays, USPS issues, man- this has been a time!
Okay. Moving on. This is month three of the Nebula sew along.
Or, for me, the month where the wheels fall off the bus.
The month where I stop pretending I'm good at following a plan or directions. I mean, how many times does life go according to plan anyways?
This started with me shipping my kit to a customer after USPS lost theirs. Rather than end up with a lot of fat eighths from cutting an additional kit, I figured I'd just either 1) cut one for me as we go or 2) use this as an opportunity to add some of my extensive Tula stash to the quilt. I went with option number two, as you can see.
I... okay. Another thing I realized this month. It hasn't affected the quilt yet, but it will in upcoming months.
I like the look of Jaybird's Galaxy quilt more than the Nebula. It's the darker background, and including yellow instead of two blue groups.

So I'll be going with the linework alternate background to give the dark/light appearance, and replacing the teal group of Nebula with a yellow group.
Let me know if you've bought the kit and are also interested in this yellow option, and I can see what I can do about kitting this up if there's enough interest.
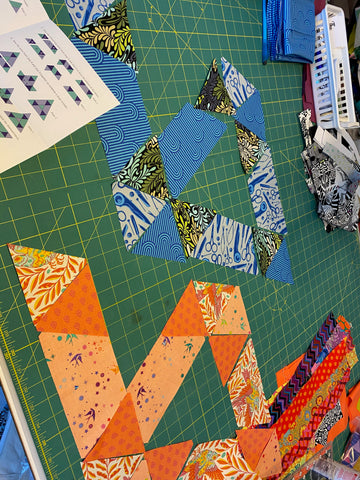
Anyways, this month I went looking through my stash for a group of 3 oranges and 3 blues, and came up with these pairings:


And this month I finally got smart about cutting these fabrics. You're doing one block twice- why cut things out twice, though?

As you can see, I put both of the same group of fabrics together, and cut at the same time. I'm also learning to be a bit more generous with my 3in strips than I was the first month or two- some of those ended up a little shy, which made some of my seams less than 1/4in later on.
Next- laying out the blocks.

I first separated the pieces I cut together and laid them out by color and type. Then, consulting the photos, I laid out both blocks on my cutting board.
Even after doing this I still screwed up in the last step, but oh well.
First you start by sewing a small triangle and half hexi to make a larger triangle- one from the top and one from the bottom of each block.
Oh- another thing. I'd first sewn one block then the other the first two months. Yeah. No. It's way easier to do both at the same time. (Duh, April.)
(Blocks with their first pieces to sew together subtracted, above)
Then you join two diamonds and a half hex to make a larger trapezoid, and sew this trapezoid to the triangle you made in sewing step 1.
This is where seam directions start to matter- you might not want to do what I did here.

Then, with the remaining pieces not in the triangle, you'll join them into a trapezoid, and again join said trapezoid to the triangle, and you'll have two (well, four) half blocks.

And the last seam of the block(s) is where you have the issue of nasty points with 6 seams coming together. If you'll notice, the top seams of the two triangles are going to nest well together, while the bottom set of two triangles were where I had one of those nasty come-on-machine-you-can-do-this seams. To avoid this, you'd need to make sure the seams on the two large trapezoids were pressed in opposite directions of one another.
But, nasty seam or not (those seams seem to be a recurring theme thus far..) you'll have two completed blocks!

Block set number three is in the books! On to month four!